Tuesday, March 15, 2011

For Kat:

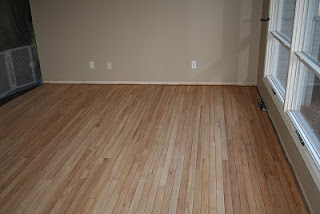
I sucked it up and took pictures of the living room floor. Please note that I did not take them during the day where every little speck of dust would show. LOL!

Please ignore the hideous floor lamp circa 1986, the wooden doors, and no trim. It's all a work in progress I tell ya. The floor lamp came from the depths of the spare room. With the dark floors, the room seems even darker in the evenings so we needed some light. I'm currently shopping for end tables.

The kid stuff...well, what can I say, we live in a small house. I always swore that I wouldn't have a living room full of brightly colored plastic toys. It's a totally different story once said child is here. I did move the little picnic table to my office for a while, but it was just too tight in there.

Yes, the curtains are too short. I hung them straight out of the package from Pier 1. They had been up a year when we refinished the floors. I figured it was time to wash them. Per instructions on the tag, I washed them in cold water and did a very cool dry cycle. I am NOT KIDDING when I tell you that these things shrunk by almost a foot! I was completely stunned when I saw them hanging there. I need to lower the curtain rod of find new curtains. Neither of which is an easy task.

Those windows are 144" long. That's right...12 FEET LONG. That rod is stretched at maximum capacity and hanging by a wish and a prayer. Do you have any idea how hard it is to find a curtain rod that long?


All in due time. One of these days it will all be finished. I've just got to learn how to finish one project before starting another. I'm impulsive. What can I say?

Monday, March 14, 2011

Nursery Part 2

Next Mr. DIY hung the drywall and re-finished the floors. There aren't too many pictures of the process because I was on bed rest. I'll just give you the Cliffs Notes version.

I don't have any pictures of the drywall going up or the mudding. So this is what the room looked like while the drywall was being sanded.


Mr. DIY is proud of all his dusty work.

Next up are the floors. These are solid oak floors that are original to the house. They have not been refinished in over 30 years. Surprisingly, they were still in pretty good shape. There were a few small spots that needed sanding and of course, it wasn't very waterproof anymore.

Being the novices that we were, Mr. DIY sanded the entire room with a 1/4 sheet palm sander...with 3 different grits. It took a long time. He also didn't wear any knee pads. *gasp*

Testing out a spot in the corner.

The room completely sanded (by hand) and ready for a clear coat of poly.

The floor is finished. Three coats of poly brushed on with a sanding in between each coat.

A close up. Not too bad for a first-timer.


And finally, the completed room (minus the trim around the floor)


Demolition

We are finally getting new flooring! It will be installed on Wednesday. Tonight, Mr. DIY is ripping out the ceramic tile in the bathroom while I take pictures and blog. I hear a few choice words coming from the bathroom right now. :)


Smile for the camera, honey!!

Wednesday, March 9, 2011

Nursery Part 1

Imported from my family blog, September 2008:

Mr. DIY started on the nursery on Sunday. For whatever reason, the nursery is the only room in the house that had wood paneling on the walls...real wood, not compressed board. We tried a test spot of Kilz primer and paint. It scratched right off the walls. We tried sanding with a block and with an electric sander. Did another test spot...still no good. That varnish or lacquer or whatever it is that was used when this house was built in the 70's was some tough stuff.

So we decided our only choice was to rip the paneling off the walls and put up drywall...which actually makes us both happy. We both had a gut feeling that the painted paneling wouldn't look nice, but neither of us wanted to say anything to the other. :) So, Mr. DIY got all the trim and paneling torn down by Sunday evening. His stepdad is going to come down and help hang and mud the drywall.

Did I also mention that we've decided to re-finish the hardwood floors in there too? It is going to be a busy month.

Removing the first piece of paneling.

Mr. DIY is proud!


All of the paneling has been removed.

Importing Posts

Many of our projects have been blogged about on our private family blog. I'm going to start bringing them over to share with all of you. So if the timing seems off, that is why. I will make a notation at the beginning of each of those posts with the date we worked on/completed these projects.

Tuesday, March 8, 2011

Refinished Hardwood Floors

The entire house has solid oak hardwood floors except for the kitchen, dining, hallway & bathroom. They are original to the house and have never been refinished since installation. Surprisingly, they look pretty good. However, they are no longer waterproof.

Toddlers with sippy cups, puppies with wet feet, adults who do not remove their shoes and floors that are no longer waterproof is a bad combination. The water spots were beginning to greatly show. It was January and the holidays were over...I needed a project. So we decided to refinish the living room floor.

I love the look of dark mahogany floors. I think they are gorgeous. What isn't gorgeous is dog hair, dust, and footprints on those dark floors. So while I'm happy with the way they look, I'm not happy about the maintenance. I even have a Roomba to vacuum for me, but I could run it 4 times a day and that floor still looks bad.

So as much as I hate to say it, we will be sanding them down again this summer and opting for a more natural finish.

In the meantime, have a look at our little project.


Here are a few before shots of the floors. Can you imagine a little board & batten in this room? I sure can!


The church bench isn't normally sitting in front of this window. I was just getting it out of the way. It sits in the nook next to the closet. I'm envisioning built-ins in that nook.

This is part of the chaos in the rest of the house. Sofa, love seat, and bookcase in the dining room.


A close-up of the floors before we began.


Trim removed and floors sanded.

Ready for stain.

Mr. DIY putting the first coat of stain down.


Would you believe I have no pictures of the finished floor? They are always so dusty, I can't bring myself to take a pic.

Thursday, March 3, 2011

Further FYI...

I also did not create this blog to try to become a popular DIY blogger or to make money from it. Let's face it, I'm not that dedicated at blogging. I just really enjoy reading other DIY/craft blogs. I also joined Twitter to chat with other DIYers/crafters. Because I didn't want to make my family blog public, I didn't have anywhere to show my projects to the other DIYers. This will give them a chance to get to know me as well as I feel like I know them.

This may not have been necessary, but I just wanted to throw that out there anyway.

~Tricia

Wednesday, March 2, 2011

New Blog

I wanted to separate my family blog from my DIY projects. While I'm sure I will talk about my son and my husband occasionally on this blog, I wanted a little anonymity when it comes to my son and his appearance on the world wide web.

So bear with me while I move some posts over and take the time to make new posts about projects that we've been working on.

~Tricia